Here's the quick summary on Filmora. For general use, Filmora is excellent.
The UI (user interface) is straightforward and pretty easy to learn.
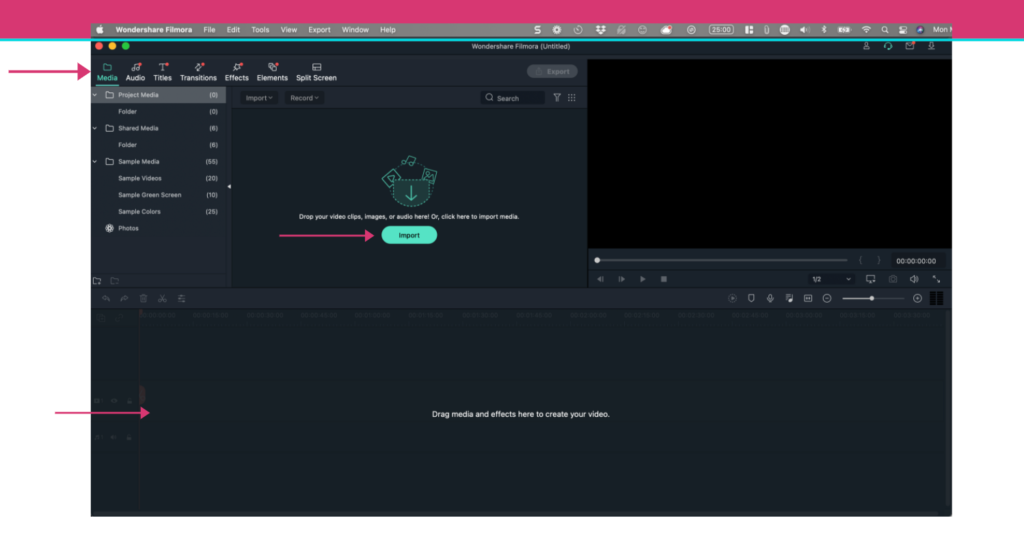
It's fast, easy to learn, and offers enough advanced features to keep you content for years. There are loads of motion graphics, lower thirds, and neat little tricks to make your videos stand out and give the impression you're a pro at video editing.
The truth is, having those little flairs, like lower thirds that move dynamically, shows professionalism and polish that keep engagement and helps make your video significantly better.
Wondershare is simple to use and really lets you unleash your creativity without getting bogged down with technical hurdles.
Pros
Very polished interface.
Inexpensive.
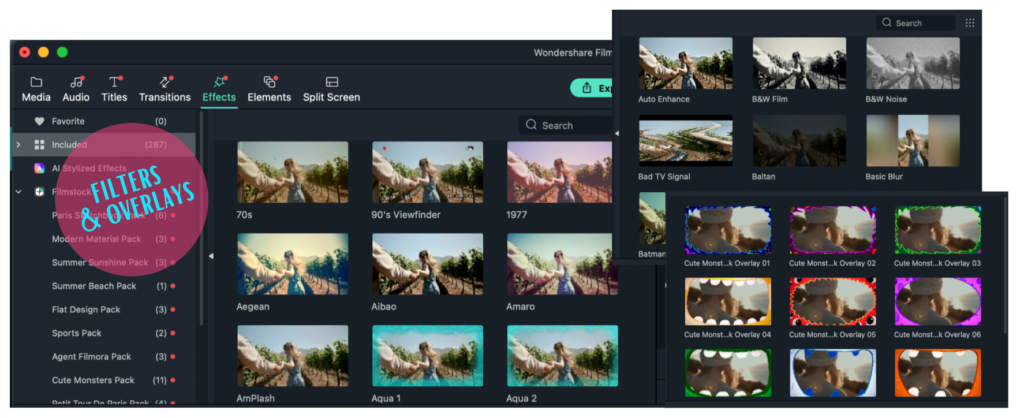
Loads of cool visual effects and overlays (check out the selection below)
Cons
Filmora is a Chinese company, and sometimes the training videos are a little bit off in terms of consistency and branding. For example, Filmora 10 and Filmora X are the same product. This is a little confusing. Also, the differences between Filmora 9 and Filmora Pro were not laid out clearly on the website.
I did find that Filmora 9 crashed periodically. This seems to be something they have sorted out and fixed with the release of Filmora 10.
4K exporting is a little bit slow, but you can customize the output to fine-tune your final product.
So Is Filmora Any Good?
Many video editing programs claim to offer professional results, but the interface is difficult to understand and the results are not ideal.
I have used Camtasia, Screenflow, Snagit, iMovie, Sony Vegas, and Filmora. With that in mind, I have tried and nearly immediately deleted Shortcut, Lightworks, DaVinci Resolve, Blender, Openshot, HitFilm, and a few others. The main problem with the free video editors is that they suck! They have really old-looking UI's and they are just not easy to figure out and get started using.
Filmora is a gem in that somebody with very little editing experience can jump in and produce something nice-looking a matter of minutes. Take a look at the interface below – it's very intuitive. And it's fun to work with!
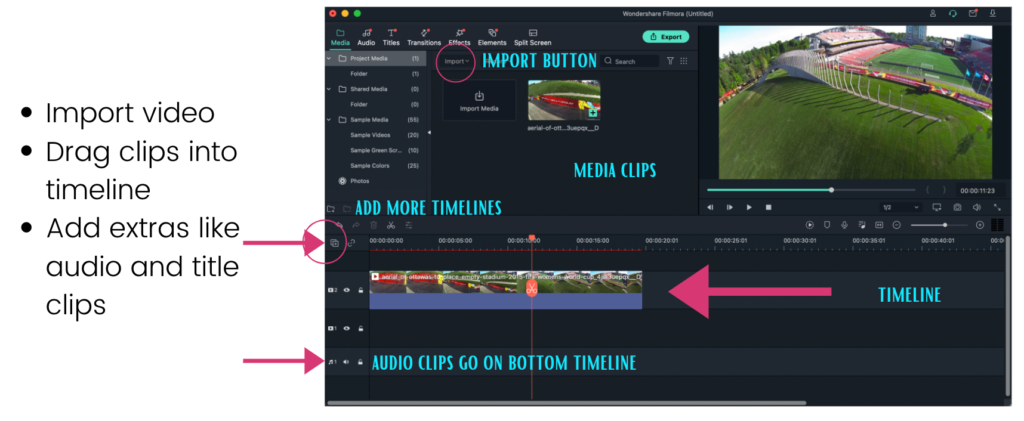
Of all the video editors, Filmora has the fun factor locked in. It's made for the YouTube-TikTok-IG age. There are silly and fun overlays that I think other video editors would think were beneath them. (Looking at you Adobe Premiere!)
One of the runner features is the split-screen feature. You can actually drag different clips into pre-divided frames and have an instant split-screen effect like the one used in the documentary on Woodstock.
Filmora is one of a few consumer-level tools that actually delivers a great editing experience and a simple workflow.
Filmora was originally released as Wondershare Video Editor, but after version 5.1.1 it was rebranded as Filmora. Wondshare also has some other tech-related products like DrFone which helps clear our iPhone data and related options.
Wondershare can be used on both Mac and PC, however, you will need to buy a separate license for both platforms, unfortunately.
It's made for non-professional video editors. Great for anyone who wants to add polish and sizzle to their YouTube videos. That's not to say you can't use it for more elaborate projects, but I wouldn't suggest using it for a full-length documentary.
Filmora omits more advanced features that you can find in more established competitors like CyberLink's PowerDirector (for example, motion tracking, Multicam, and support for 360-degree videos.) But if you're not planning on using those, you get a ton of value out of Filmora.
Pricing
Filmora offers a free trial download, but the limitation is you can only export footage 10 times, and you will have a Filmora watermark on your exported projects.
Filmora offers an annual subscription model (as Adobe does for Premiere Pro ), but if you can spring for a little bit more, you can secure a permanent license. The Mac version costs $44.99 per year or $59.99 for lifetime access, while the Windows version is $39.99 and also $59.99 lifetime. Both of those options are really great value for what you get in Filmora.
A paid Filmora license also gets you a bunch more effects, royalty-free music, and motion graphics to use in your video projects, of course, it removes watermarks and adds 24/7 technical support. New effect collections are also added every month for paying customers. I have only used the MAC version of Filomora, although the two versions are very similar. The main difference, apart from subscription pricing, is that the Mac version doesn't have Easy mode and Freeze Frame.
Multiple Tracks
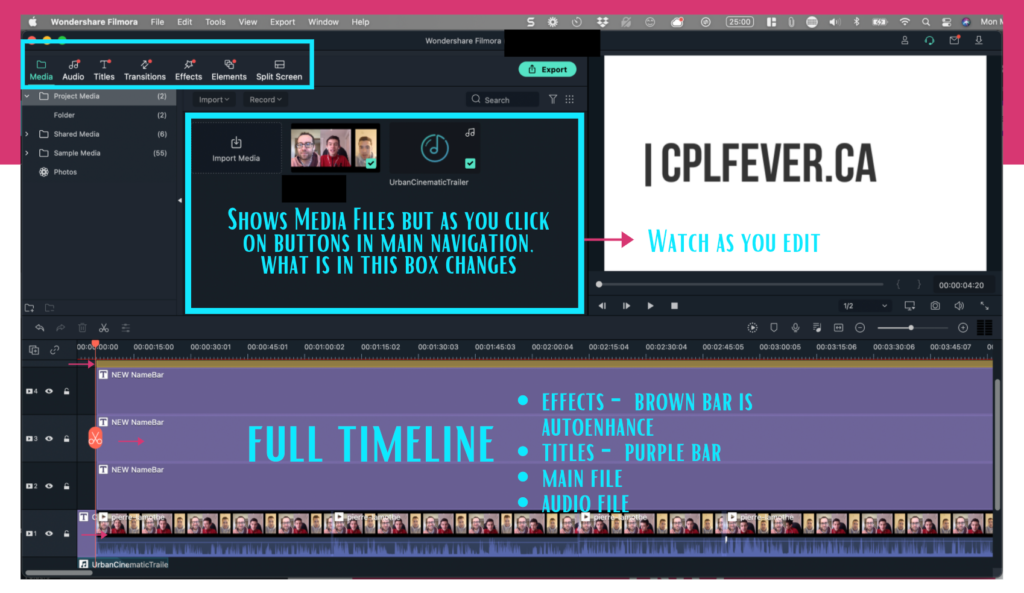
With Filmora you can add multiple tracks. There is not a limit on how many tracks, so you can easily add elements and sound to spice up your videos.
One nice thing about the tracks is Filmora keeps them separated with the video tracks in the middle, the audio tracks at the bottom, and the overlay tracks on the top. This really makes it easy to organize your project if you have multiple tracks.
Filmora X New Features
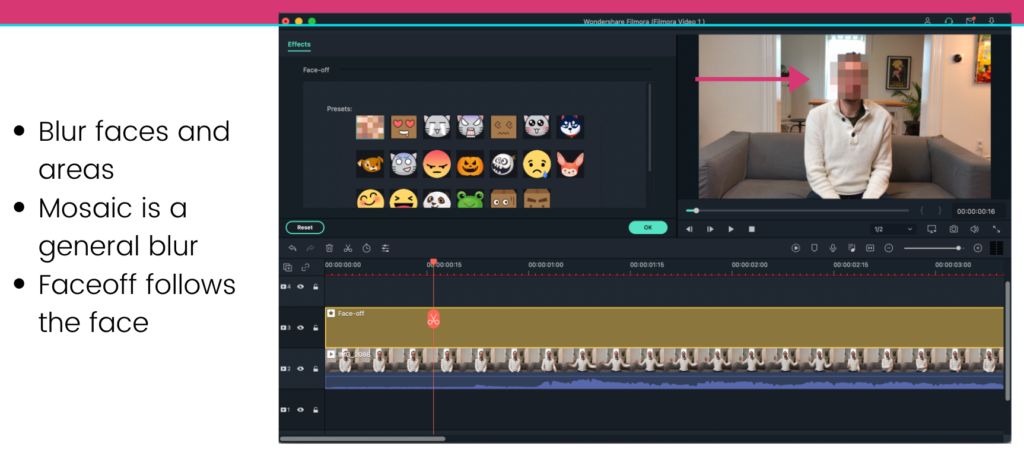
Perhaps the most exciting new feature of Filmora X is motion tracking. You can have a cartoon head follow a face or easily blur them out with an effect called “Face-Off”
This can be useful for creating those catchy GIF memes.
Audio Ducking
Audio Ducking is a new feature in Filmora X. Ducking drops the sound of background music/noise slightly when a person is talking in a clip so they are not competing with the background music. This is perfect for amateur filmmakers, however, professionals would balk at such a feature. For most users of Filmora, this can again help improve the video without any extra time.
Touch Bar (Mac) – Preview and scrub through your timeline using the touch bar.
The rendering of projects is much faster in Filmora X.
There are a ton of new filters to give your clips a little extra oomph. Some of these are quite dramatic, so think of these as Instagram Filters for your video clips. I think this is where Filmora really shines for amateur filmmakers and YouTubers.
The key to success online is grabbing and holding attention. And the filters and overlays are what really set Filmora apart for me. Just a little bit of work and you can make any video stand out and grab attention. Try it for yourself and you'll see what I mean.
Filmora X: Color Correction
There's a large number of preset color filters, but if you want more precise color controls, the tools are pretty generic. Each clip has a color tab, where you can adjust sliders like contrast, brightness, and color temperature, or let the application automatically adjust color and white balance –
A new tool in Filmora X is color matching. You select a clip in your timeline, then, using a comparison view, select another clip to match it with. So you can easily adjust one clip to have a similar color palette to the second. This shows a lot of promise and is very helpful if you have filmed under different light sources or shadows. It's a quick and dirty way of getting a consistent look across various clips in your project.
Final Thoughts
Wondershare Filmora is a great video editing software that balances powerful features with an intuitive interface at an affordable price point. It supports all modern video formats, as well as HD and 4K video editing and output.
It's not a professional video editing suite, but most beginners and intermediates will be happy with the results.
Download a Filmora for Mac or Windows today.
Hey, I'm Andrew. I moved to Lisbon, Portugal from Canada. Follow my journey here.
I also happen to run a SAAS that helps marketers give their shared links superpowers. You can create a free account and start being more productive: Check out Linkalytics here.
I'm passionate about AI and using AI tools to help creators and marketers create better content, faster. Get the jump on AI and discover free AI tools every week.
Read my writings on Medium.
Got a marketing question? Need some direction? Book a call with me.

